Home – Custom Lapel Pins – Custom 3D Die Cast Lapel Pins
3D DIE CAST LAPEL PINS
Custom 3D Die Cast Lapel Pins: Depth, Detail and Cut-Throughs
3D lapel pins are cast, not stamped. Molten zinc alloy fills a steel mold, so the design can rise in several levels, curve, and open into a cut-through, things a flat sheet cannot do. We build the 3D drawing first and you approve it before the mold is cut. Runs start at 100 pieces per design, with a free proof. Samples ship in 7-10 days, bulk orders in 15-18 days. These pins sit inside our custom lapel pins range for brands, sports clubs, military units and distributors.
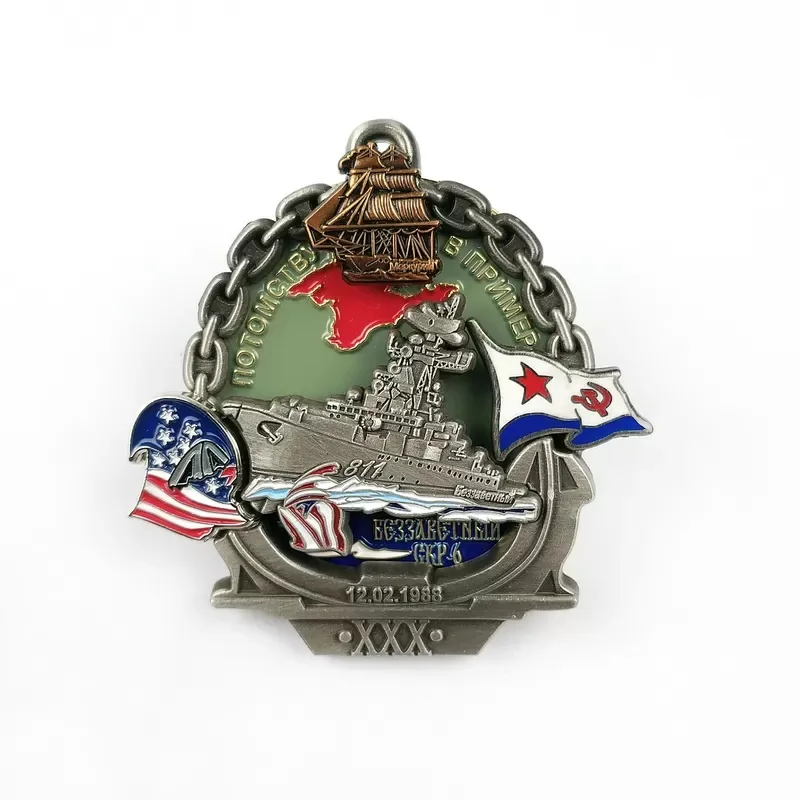
A cast pin sits higher than it is wide: the levels, not the outline, carry the design.
Since 2010
Focused on custom pins
30,000+ pcs a day
In-house production
MOQ 100 pcs
Start your project easily
Bulk 15-18 days
Counted from approval
1. 3D Lapel Pins We Have Produced
Each piece is listed with structure, plating, color method, size and use. Only true 3D cast pins in lapel size are shown; badges and medals belong on their own pages.
- Size:48 × 58 × 4 mm
- Structure:Full 3D die cast
- Plating:Antique silver
- Color:Soft enamel
- Use:Commemorative events, museum souvenirs and collector programs
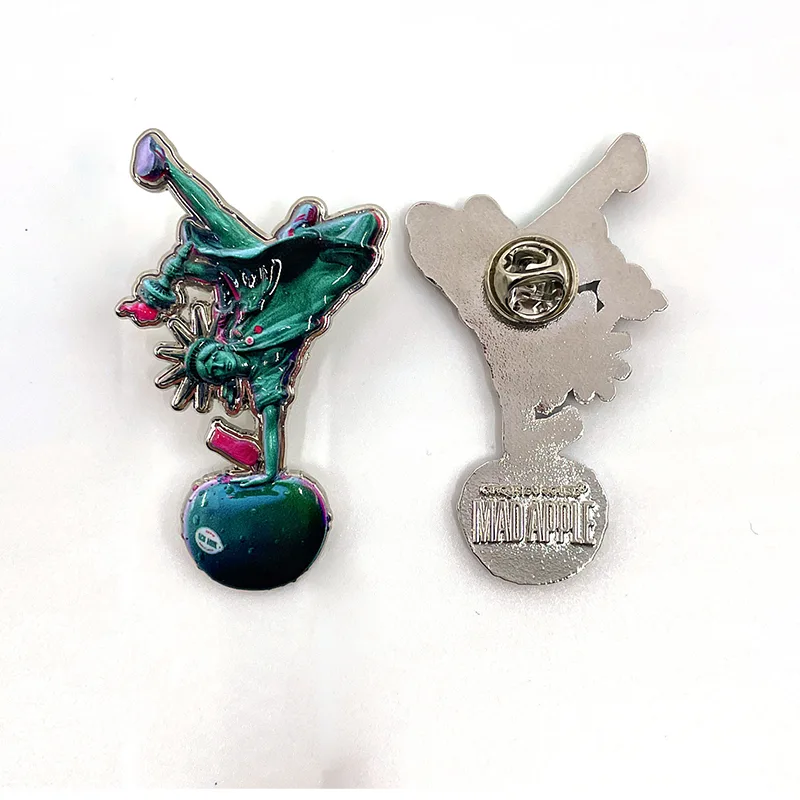
- Size:35 × 58 × 4 mm
- Structure:2.5D die cast with raised sculpted character relief
- Plating:Antique silver
- Color:Multi-color soft enamel
- Use:Character merchandise, collector series and promotional gifts
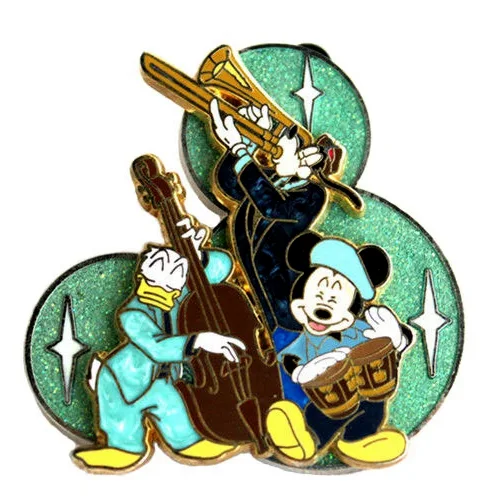
- Size:55 × 50 × 4 mm
- Structure:Multi-level 2.5D die cast
- Plating:Shiny gold
- Color:Multi-color soft enamel
- Use:Licensed merchandise, entertainment events and collector pins
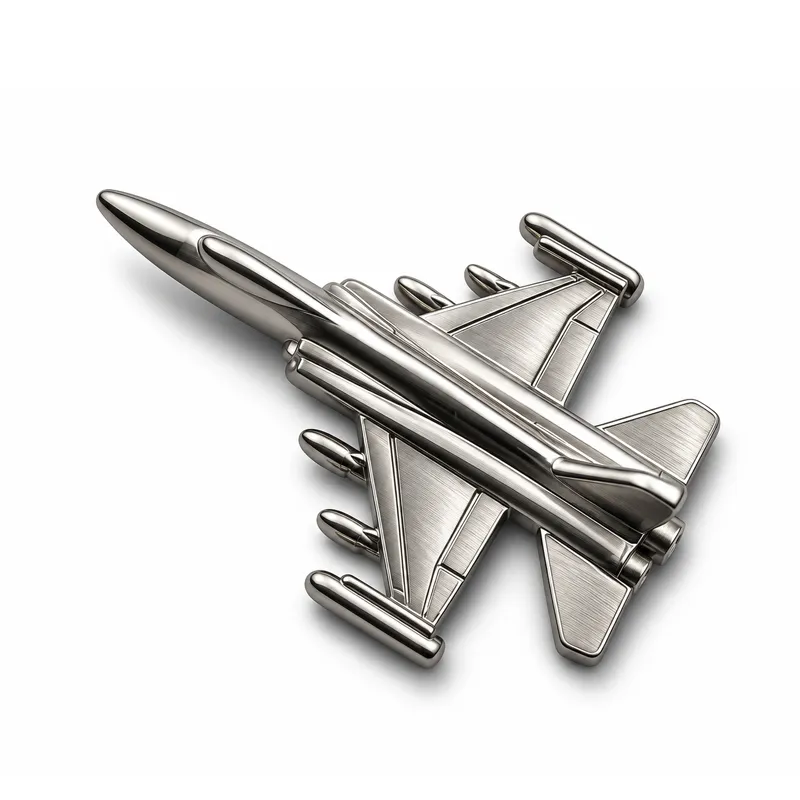
- Size:50 × 45 × 5 mm
- Structure:Full 3D die cast with sculpted aircraft body
- Plating:Shiny silver
- Color:No enamel
- Use:Aviation commemoratives, military units, air shows and collector programs
Case records are being prepared from the sample archive. Flat enamel, stamped and printed pins stay out of this block.
Badges such as police and school shields belong to custom badges.
2. How a 3D Die Cast Pin Is Made: 3D Drawing, Mold, Shot, Finish
A 3D die cast pin travels five stages from a flat file to a sculpted piece. Each stage closes off options the next one cannot reopen.
01
Production drawing
Artwork is broken into what rises, what sinks and where the piece opens. A flat file shows the front only; a cast piece has a side.
02
3D mold drawing
We build the piece in JDPaint and return several angles. You approve this drawing, not the original flat file.
03
Mold cutting
CNC cuts the cavity on three axes, then EDM and heat treatment. Cast molds are heavier than stamping dies.
04
The shot
Zamak 3 melts at 385 C and is injected on an 88-ton or 25-ton hot chamber machine. Large work and samples run on different machines.
05
Trim and finish
Deflash, cut the parting line, grind, polish, then plate, color or print. The parting line is decided at the drawing stage.
The one line to remember. Die casting is not stamping pressed deeper. It is a separate forming route. Stamping pushes metal out of a sheet; casting pours metal into a mold.
Related: zinc alloy die casting process
3. 3D, 2.5D or Die Struck: Which Process Your Artwork Needs
Three words get used as if they describe the same thing. They solve three different artwork problems.
Die struck
Artwork pressed into a 1.5-2.0 mm blank, one shallow layer. Walls run almost vertical. Best for shields, seals, initials and short text.
2.5D die cast
Most of the surface stays flat and one element is lifted. Best when a little volume is needed but large flat color areas remain.
Full 3D die cast
Multiple levels, rounded transitions, cut-throughs and different heights front to back. Best for figures, animals, mascots and buildings.
| If your artwork looks like this | Go with | Why |
|---|---|---|
| A flat logo, lettering, line art or shield | Die struck or printed | Shallow relief is enough; lower tooling and unit price |
| Mostly flat with one raised element | 2.5D die cast | One lifted level carries the effect without rebuilding the whole piece |
| A figure, animal, mascot or building | Full 3D die cast | Rounded transitions and stacked levels are beyond stamping |
| A design that needs a hole through the body | Full 3D die cast | Stamping cuts the outline only |
| Different heights front and back | Full 3D die cast | Stamping presses one face; the back stays flat or slightly raised |
| Large and thin, 60 mm and up, weight-sensitive | Die struck | A cast piece that size is heavier, and material and freight follow |
What changing process costs. Moving a design from stamping to casting is not a menu selection. The tool is remade, the artwork is redrawn, a fresh sample is struck, and the approved sample is dead. Twenty minutes spent settling the process before tooling opens is the cheapest step in the project. Send a quote you already hold and we will tell you whether the process behind it is the right one.
Related: die struck lapel pins
4. From Flat Artwork to a 3D Drawing: What We Draw and What You Approve
This is the step most casting pages skip, and the one that decides whether the mold works on the first attempt.
1
Production drawing
Height relationships, opening positions, minimum detail.
2
3D mold drawing
Built in JDPaint, returned from several angles: side, layers, undercuts, lettering.
3
Your approval
You sign off the 3D drawing, not the flat original.
4
Mold cutting
Steel is cut only after that approval.
What you send
A vector file if you have one: AI, PDF or EPS. A JPG or PNG still works, but fine detail is lost. Add a reference photo and one sentence on depth intent: a slight swell, or a relief as tall as a commemorative coin.
Four things to check on the 3D drawing
Level order. The highest point should be the part the eye lands on.
Rounded transitions. A corner that should be round will read as a defect at production size.
Lettering. If the stroke looks shallow on the drawing, it closes up in metal.
Undercuts. An inward side wall cannot release; it needs a slide or a redesign, decided now.
The 3D drawing includes three rounds of changes inside the sampling process. Work beyond that is quoted against the drawing. Related: artwork requirements
5. How Much Depth a Die Cast Pin Can Hold
“3D” is not a switch. It is four levels, and asking for 3D can mean any one of them.
Flat
1 layer
No rounded edges
Cut-through: Outline only
Cost: Lowest
Shallow relief
1 shallow layer
Almost square
Cut-through: Outline only
Cost: Low
2.5D die cast
2 layers
Locally rounded
Cut-through: Possible
Cost: Medium
Full 3D die cast
3 or more layers
Rounded throughout
Cut-through: Possible, incl. hollows
Cost: Highest
How tall can the relief go? With a base of 2-2.5 mm, the highest point typically stands 1.5-3 mm above the base plane. Anything taller needs a thicker base and is quoted against the drawing. Full 3D work usually runs 3-5 levels. Beyond that is not impossible; it is a mold and yield question that rarely pays.
How large can a cut-through be? The minimum opening is 2 mm, growing with piece thickness above 2.5 mm. Leave 1.5-2 mm of wall between the hole edge and the outer edge, or the edge will chip. A hole through the body is something only casting can make.
Do more levels cost more? Yes, but not in a straight line. Every added height means another engraving and polishing pass in the cavity, and a higher risk of shrinkage and flash. The answer to “can we add one more level” is usually not no; it is whether the level earns its cost.
6. Will Your Design Cast Cleanly? The Limits We Check Before Quoting
Six numbers are checked before a price is written. If one fails, a beautiful drawing still will not cast.
| Check | Limit or rule | What happens if it fails |
|---|---|---|
| Minimum line width | 0.2 mm | The line cannot be cut, or the metal will not fill it, and the finished line breaks |
| Minimum wall thickness | 2 mm body and around holes | Metal will not reach a thin wall, leaving a short shot or a cold shut |
| Draft angle | 1-2 degrees per side; 3 degrees in deep cavities | A vertical or undercut wall grips the mold and tears on ejection |
| Undercuts | Not permitted; add a slide or change the structure | Forcing one drags the surface, damages the mold, or adds slide cost |
| Minimum cut-through | 2 mm; larger above 2.5 mm | A small opening fills incompletely and chips at the edge |
| Dimensional tolerance | +/-0.1 mm mating; +/-0.25 mm outline | Backings and magnets will not seat correctly |
Six numbers, one question: will this file be made? Every line above is checked against your artwork before a quote is written. A file that clears all six goes to tooling. One that fails is cheaper to fix now than after the mold is cut.
Related: artwork requirements

The 3D drawing shows collapsed relief, inward walls and closed lettering before steel is cut.
7. Color on a Sculpted Surface: Enamel, UV, Plating or Antique
Coloring a sculpted piece is not coloring a flat one. Color goes onto a surface that rises and falls.
| Sculpted structure | Recommended color | Why |
|---|---|---|
| High relief with 2-3 colors | Spot soft enamel or hand fill | Color stays in the recess while the raised face keeps its metal |
| Multi-level detail, no color wanted | Plating plus antique | Contrast comes from light and shadow, not pigment |
| Flat recesses, many colors | Soft enamel | Regular cavities give a clean color boundary |
| Gradients, photographs, complex art | UV print | One pass; keep relief within about 7 mm or the print loses focus |
| Large single-color areas | Spray or electrophoretic coating | Even coverage at low cost |
Plating sets the contrast. Black nickel is already dark, so a dark recess merges into the face and the detail disappears. Highly polished gold or silver eats the fine edges. A dark plating on a high relief is the combination most likely to disappoint; antique gold, antique silver and antique copper keep the raised face readable.
One combination only casting can carry: a high raised face, spot enamel in the recess, and an antique plating over the whole piece. A stamped pin cannot build enough height difference for color and metal to separate into two readable planes.
Related: enamel lapel pins | printed lapel pins | plating options
SPECIFICATIONS
8. 3D Die Cast Lapel Pin Specs
Size. 15-60 mm standard; larger quoted against the drawing.
Thickness. 2-2.5 mm base, up to 5 mm at the thickest point.
Material. Zamak 3 zinc alloy only.
Plating. Gold, silver, copper, antique gold/silver/copper, black nickel, matte.
Color. Soft enamel, UV, spray, electrophoretic, transparent enamel.
Backing. Butterfly, rubber clutch, magnet, safety pin, adhesive.
Packaging. Poly bag, backing card, velvet box, display box.
Estimated unit weight (Zamak 3, 6.7 g/cm3)
| Size | 2.0 mm base | 2.5 mm base |
|---|---|---|
| 0.5 in (12.7 mm) | 1.7 g | 2.1 g |
| 0.75 in (19 mm) | 3.8 g | 4.8 g |
| 1 in (25.4 mm) | 6.8 g | 8.5 g |
| 1.25 in (31.8 mm) | 10.6 g | 13.3 g |
| 1.5 in (38.1 mm) | 15.3 g | 19.1 g |
| 2 in (50.8 mm) | 27.2 g | 33.9 g |
Estimate, not a weighing. Real pieces run 10-20% above these figures because relief adds volume.
9. Where 3D Lapel Pins Are Used
Five kinds of project come back to casting again and again, for one reason: a flat pin cannot carry the subject.
Brand characters and mascots. A flat logo cannot hold a character’s volume or expression.
Police, aviation and fire service. Unit crests and commemorative pieces rely on stacked levels to read as an award.
Sports clubs and events. Mascots and trophy-shaped pins hold up better in trading and collecting.
Associations and alumni groups. A year, a motto and a figure can share several levels without crowding the face.
Promotional distributors. A client asking for something that looks expensive needs a sample that shows it.
Large identity pieces are custom badges. The same casting line also runs custom challenge coins, a separate product family.
A cast mascot pin: the face, body and base sit on different levels.
10. What We Check Before Packing 3D Pins
Cast defects are not stamping defects. Casting is checked inside the metal and along the parting line.
Porosity and shrinkage
Surface sinks and internal voids, most likely in thick high-relief sections
Ref. Section 4
Parting line and flash
Raised burr along the split, and whether a mark remains after trimming
Ref. Section 1
Plating coverage
Recesses, hole interiors and the back; deep recesses miss first
Ref. Section 6
Color bleed
Whether fill crosses a raised boundary; hand-filled areas get the closest look
Ref. Section 6
Cut-through edges
Chipped edges and sharp burrs around openings
Ref. Section 5
Backing strength
Weld or rivet security on a back that is not flat
Ref. Section 7
Each line refers back to a number or rule stated above. Inspection is not strict for its own sake; it checks the pin against the same limits. Related: quality control
37%
more than die struck, same size and quantity
Source: two public price tables from the same supplier, 0.5 inch at 100 pieces: $1.50 stamped, $2.05 cast. Not our quote.
11. What Drives the Price of a 3D Die Cast Pin
| Variable | What it changes | What you can adjust |
|---|---|---|
| Projected area | More surface, more alloy and clamp pressure | Reducing size is the most direct saving |
| Relief volume | Height and levels raise alloy use, cycle time and shrink risk | Fewer levels and a lower peak |
| Mold complexity | Levels, openings, slides and parting line decide machining hours | Avoid undercuts and unnecessary openings |
| Color count | Every color adds a fill pass and an inspection | Fewer, stronger colors, or switch to UV |
| Quantity | Tooling spreads across the run | Combine designs and place one order |
No fixed price grid: two pins at the same diameter can land a factor apart once volume and complexity are counted. Five variables you can work through are worth more than a number nobody can trace.
LEAD TIME & TOOLING
12. MOQ, Lead Time and Tooling
Minimum order. 100 pieces per design.
Sampling. 7-10 days.
Bulk production. 15-18 days.
Tooling storage. 3 years.
Tooling refund. At 10,000 cumulative pieces for the same design.
One mold decides everything. Stamping uses two tools: a design die and a trim die. Casting uses one mold that sets the face, the side profile and every opening at once. Change one outline and the whole mold is remade. That is why 3D drawing approval happens before the cut: the last moment a change costs a file edit instead of steel.
What a quote needs: artwork, size, quantity, plating, color method, backing and packaging. Missing items get asked about, not assumed.
13. Frequently Asked Questions
The questions that come up most often once you have the depth, the limits and the price in front of you.
Start Your 3D Lapel Pin Project
Send the artwork, the size and what the pin is for. A quote and a 3D drawing come back, and if the design belongs in stamping rather than casting, we will say so before you spend anything on a mold.
1. Send your artwork or idea. A logo file, sketch or photograph of an existing piece all work.
2. Quote and 3D drawing. We confirm the process, the depth structure and the finish, then send the 3D drawing for approval.
3. Sample, approval, production. Sample in 7-10 days; bulk in 15-18 days from written approval.